Wednesday, February 26, 2020

Wrapping angle

Because nature of rotation angle, when we interpolate angles we could have some problems. For instance we have angle A0 and A1.

A0 is -170 degree
A1 is 170 degree

If we interpolate A0 to A1 then it will take 340 degree turn to reach the A1.(which is clockwise)

instead we can take 20 degree which is counter-clockwise, it is much faster way to reach A1. To solve this kind of problem we can use wrap angle technique.


// angle in degree
float wrapPI(float angle)
{
float secondTerm = floor((angle + 180.0f) / 360.0f);
return angle - 360.0f * secondTerm;
}

floor is the function which will take same as given input x or highest integer value less than.

As you can see the below video, blue line is the A0(which is base angle) and red line(longer one) is the target angle which is A1. shorter red line is the result of interpolation.


// angle in degree
float wrapPI(float angle)
{
float secondTerm = floor((angle + 180.0f) / 360.0f);
return angle - 360.0f * secondTerm;
}

float baseAngle = 0;
float targetAngle = 90;
float angleRatio = 0.0f;

void Render(HDC hdc)
{
XFORM xForm;
xForm.eM11 = (FLOAT) 1.0;
xForm.eM12 = (FLOAT) 0.0;
xForm.eM21 = (FLOAT) 0.0;
xForm.eM22 = (FLOAT) -1.0;
xForm.eDx = (FLOAT) 300.0;
xForm.eDy = (FLOAT) 300.0;

SetGraphicsMode(hdc, GM_ADVANCED);
SetWorldTransform(hdc, &xForm);

float baseLength = 100;
float targetLength = 80;

float diffAngle = wrapPI(targetAngle - baseAngle);
float angle = baseAngle + (diffAngle * angleRatio);
// draw baseAngle
HPEN bluePen = CreatePen(PS_SOLID, 1, RGB(0, 0, 255));
HPEN redPen = CreatePen(PS_SOLID, 1, RGB(255, 0, 0));
HGDIOBJ oldPen = nullptr;

oldPen = SelectObject(hdc, bluePen);
MoveToEx(hdc, 0, 0, nullptr);
// convert degree to radian
float baseRadian = baseAngle * 3.14 / 180.0f;
LineTo(hdc, cosf(baseRadian) * baseLength, sinf(baseRadian) * baseLength);

SelectObject(hdc, oldPen);
DeleteObject(bluePen);
oldPen = SelectObject(hdc, redPen);
MoveToEx(hdc, 0, 0, nullptr);

float angleRadian = angle * 3.14 / 180.0f;
float targetRadian = targetAngle * 3.14 / 180.0f;
LineTo(hdc, cosf(targetRadian) * baseLength, sinf(targetRadian) * baseLength);

MoveToEx(hdc, 0, 0, nullptr);
LineTo(hdc, cosf(angleRadian) * targetLength, sinf(angleRadian) * targetLength);
SelectObject(hdc, oldPen);
DeleteObject(redPen);

angleRatio += 0.01f;

if (angleRatio >= 1.0f)
{
// choose another
baseAngle = rand() % 360;
targetAngle = rand() % 360;
angleRatio = 0.0f;
}
}

Monday, February 24, 2020

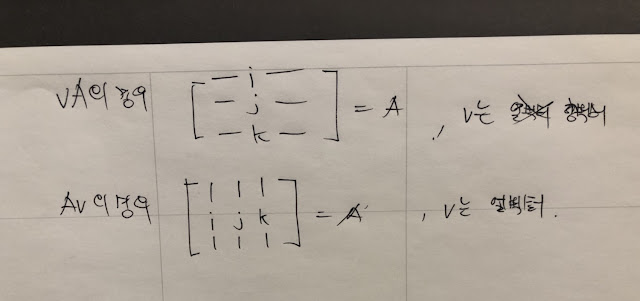
Representation of basis vector in matrix form.

When you read math books related with game programming, you should know representation of basis vector is depends on representation of vector form.

if the book uses row vector then vector multiplication with matrix is going to be
vM form which is above form in the below image.


if the book uses column vector then vector multiplication with matrix is going to be Mv form which is below form in the above image.

Representation of basis vector i, j, k are also depends on the order of vector representation like the image I shown.


Sunday, February 9, 2020

Dynamic Bone


DynamicBone

초기 설정
루트로 설정한 게임 오브젝트의 자식들을 모두 순회하면서 파티클들을 등록한다. 여기서 사용하는 파티클이라는 용어는 물리를 적용할 요소를 뜻한다.

현재 게임 오브젝트의 월드 위치를 저장하고 부모에 상대적인 localPosition, localRotation을 저장하고 있다. 이것들은 모두 m_InitLocalPosition, m_InitLocalRotation에 저장된다. 이 초기 위치와 회전들은 이후에 파티클들을 리셋 될 때 재사용된다. (물리 LOD가 적용되거나 특정 파라미터 값들이 수정되었을 때 리셋된다.)

물리 LOD
물리 시뮬레이션을 적용할 오브젝트가 지정된 오브젝트로부터 너무 멀리 떨어져 있으면 물리 시뮬레이션을 생략한다. 물리 LOD와 같은 개념이다.

UpdateDynamicBones(float t)
이 함수에서는 주어진 시간 t동안 얼만큼 물리 시뮬레이션 돌려야 하는지 결정하고, 결정된 횟수만큼 물리 시뮬레이션을 돌린다. 이때 m_UpdateRate가 사용되는데 기본적으로 60으로 되어 있다. 1 / 60값으로 t를 나누어 얼만큼 물리 시뮬레이션 돌려야 하는지 결정하는데 이 횟수를 최대 3회로 제한한다.

횟수가 결정되고 나면 UpdateParticles1(), UpdateParticles2()를 호출함으로써 물리 시뮬레이션 한다.

Verlet 적분
속도를 사용하지 않고 가속도와 이전 위치 만으로 다음 위치 값을 얻어낼 수 있는 방법.
xi+2=2xi+1xi+aiΔt2

식에서 알 수 있듯이 현재 위치를 i+1이라고 하면 이전 위치 xi와 가속도 ai만으로 i+1의 다음 위치 i+2의 위치를 알 수 있다. DynamicBone은 이 방법을 사용해 물리 시뮬레이션 한다.

UpdateParticles1()
중력을 적용하고 (그런데 반대로 한다.) m_Force를 적용한다. (바람과 같은 힘을 적용하고 싶을 때 사용) 내부적으로 물리 시뮬레이션은 Verlet Integration을 사용한다. 모든 파티클들에 동일한 이동(루트 오브젝트의 이동)을 적용한다.

UpdateParticles2()
이 함수에서는 여러가지 작업을 차례차례 처리한다. 가장 먼저 기본 모양을 유지하는 코드가 있다. (keep shape 부분)

모양 유지
파티클의 초기 위치(로컬 좌표계에서의 위치)로부터 월드 공간에서의 위치를 얻고 restPos에 담는다. 그리고 restPos – p.m_Position을 통해 현재 파티클에서 초기 위치로의 방향을 얻는다. 이 벡터를 현재 파티클에서 m_Elasticity 비율값을 사용해 원래 위치로 돌아가는 처리를 진행한다.

한 가지 특별한 사항은 월드 공간에서의 위치를 얻기 위해 사용하는 행렬 m0을 사용할 때 위치 값을 아래와 같은 코드로 사용한다는 점이다.

m0.SetColumn(3, p0.m_Position); // m_Position UpdateParticle1에서 업데이트 된 후의 월드 공간 위치

이것은 p0.m_Position 이며 UpdateParticle1 함수에서 업데이트 되고 난 후의 위치다. 현재 게임 오브젝트의 변환에는 아직 이동이 적용되지 않았으므로 이동을 업데이트하기 위해 SetColumn 함수를 사용해 이동을 업데이트 한다. 그 이후에 이 행렬을 사용해 자식 게임 오브젝트의 로컬 위치를 월드 공간으로 변환하여 restPos(되돌아갈 위치)를 얻는다.

충돌 처리
파티클의 이동에 있어 다른 오브젝트와 충돌 처리를 할 필요가 있다. DynamicBoneColliderBaseCollide 함수를 사용해 파티클 위치를 조정한다.

각 고정
물리 시뮬레이션은 특정 축에서만의 움직임으로 강제할 수 있다. 특별히 관심 있는 부분은 아니므로 생략.

거리 유지
Vector3 dd = p0.m_Position - p.m_Position;
float leng = dd.magnitude;
if (leng > 0)
p.m_Position += dd * ((leng - restLen) / leng);

파티클을 변환에 적용하기
파티클 업데이트에서 변경된 위치로 게임 오브젝트들의 위치를 업데이트 한다. 이때 사용되는 회전은 부모에서 자식의 방향으로 회전한다.


Sunday, February 2, 2020

v' = vRT

when we use row vector v then applying matrix multiplication.

vRT

Rotation matrix R will be applied first and then T will be applied.
Order that the matrices are multiplied, from left to right.

Saturday, February 1, 2020

DOS style directory viewer

I've just made a DOS style directory viewer for fun. Implement all the UI features by hand is really fun to do. you should try too!


Task in UnrealEngine

 https://www.youtube.com/watch?v=1lBadANnJaw